Showing posts with label rustic cottage. Show all posts

Wednesday, July 20, 2016

Country Cottage Christmas

Hello Everyone!
If you are interested in my Blog Candy... CLICK HERE.

Another Christmas card today. This time I went in the Country Christmas direction. The image is one I printed last year from The Graphics Fairy, I have added some real stitching to the panels, as I have been much braver with my sewing machine since my talented bloggy friend Anne of Redanne did up a post about using sewing in crafting. You should really check that out here. THANKS ANNE!


The papers are from Michaels Craft Store. The green is from My Minds Eye - Holiday Cheer, and the music notes paper is from DCWV - The Primrose Stack. The doily is from Prima, the flowers are from Wild Orchid Crafts, the laces are from May Arts and everything else is from my stash.


I picked the miniature pine cones myself, how awesome is that!! I couldn't find any information on the internet about if picking pine cones is harmful to the trees or not, so I only took a few. If anyone has some knowledge about this, please let me know.


***
Last weekend we took a trip to a spot along the river in the Riverwood Conservancy. This place is massive and will take us dozens of trips to cover all of the trails. The entrance is at the top of a huge hill, which was great on the way down to the river... not so great coming back!! lol


There were such fun paths, old ruins and amazing trees, it felt like being in some enchanted forest straight out of a J.K. Rowling's novel!


The remains some old building or lookout, with a stone staircase which looked much to rickety to actually walk down. Maybe next time? lol


Then finally we were at the river. I have saved those photos for another day because I took about a billion of them. lol


 BUT THEN WAS THE UPHILL HIKE BACK TO THE CAR. DOH!


Back on the home front our little baby sparrow has decided it's much easier to take food from the balcony than bother with flying up to the feeder. So sweet!


I FINALLY HAD MY FIRST WOODPECKER!!!! YAY!!!!
This little guy is a Downy Woodpecker with just a small patch of red on his head.


PATRICIA has quickly become one of my favourite little visitors. She just loves to play hide and seek in the tree, and watch me as I go about my daily routine! I can't help but smile when I see her peeking out from behind a branch! 


Oh SKITTLES, how cute are you!


Be very very quiet, something has caught the full attention of dear MR BAGGINS!


I'm not even sure what to say about JUNIOR today... I think this photo is worth a thousand words!


My token after dinner shot...


That's it for today. Thank you for stopping in and for all the amazing comments. If you have any questions or interesting tidbits about today's wildlife, please let me know.


Friday, July 24, 2015

Home Sweet Home - DecoArt Birdhouse

Hello Everybody!

I'm very excited to share with you today, my first full on DecoArt project since being accepted into the DecoArt Blogger Outreach Program. DecoArt was so generous with their box of goodies and I had a lot of fun putting them to good use on my birdhouse. This will be going to my wonderful Mom for her to display in her garden porch. She has lots antique elements in her porch and I think this will blend in perfectly, plus it has pictures of my little ones when they were just tots and she just loves them to bits!


I would like to send out a couple of special thank you messages today to some wonderful and talented ladies. First of all to Tracy - Craft Addicts, who so is so kind and generous. She sent me some rolls of rusted wire, which you can see wrapped around my birdhouse. How sweet is that!  Secondly to Niki - Pawsitively Creative Crafts, my team member and friend who turned me on to Rusting Powder, which I used to antique the brooch on the frame. You can find her spotlight HERE. Thanks ladies, big hugs to you both!


THE FRAME AND 'FAMILY':

- I applied a coat of Americana Desert Turquoise which is such a gorgeous colour, and then I applied some DecoArt Media Crackle Glaze. Once it was dry, I rubbed some Antiquing Cream English Red Oxide into the cracks. These creams are wonderful, they go on so smoothly and are super easy to work with. I lightly rubbed a bit of Metallic Lustre Brilliant Turquoise on the top for a beautiful shimmer. I wish it showed better in the photographs, in real life it's so sparkly and what a great way to showcase my two darling little girls!


THE BIRDHOUSE:

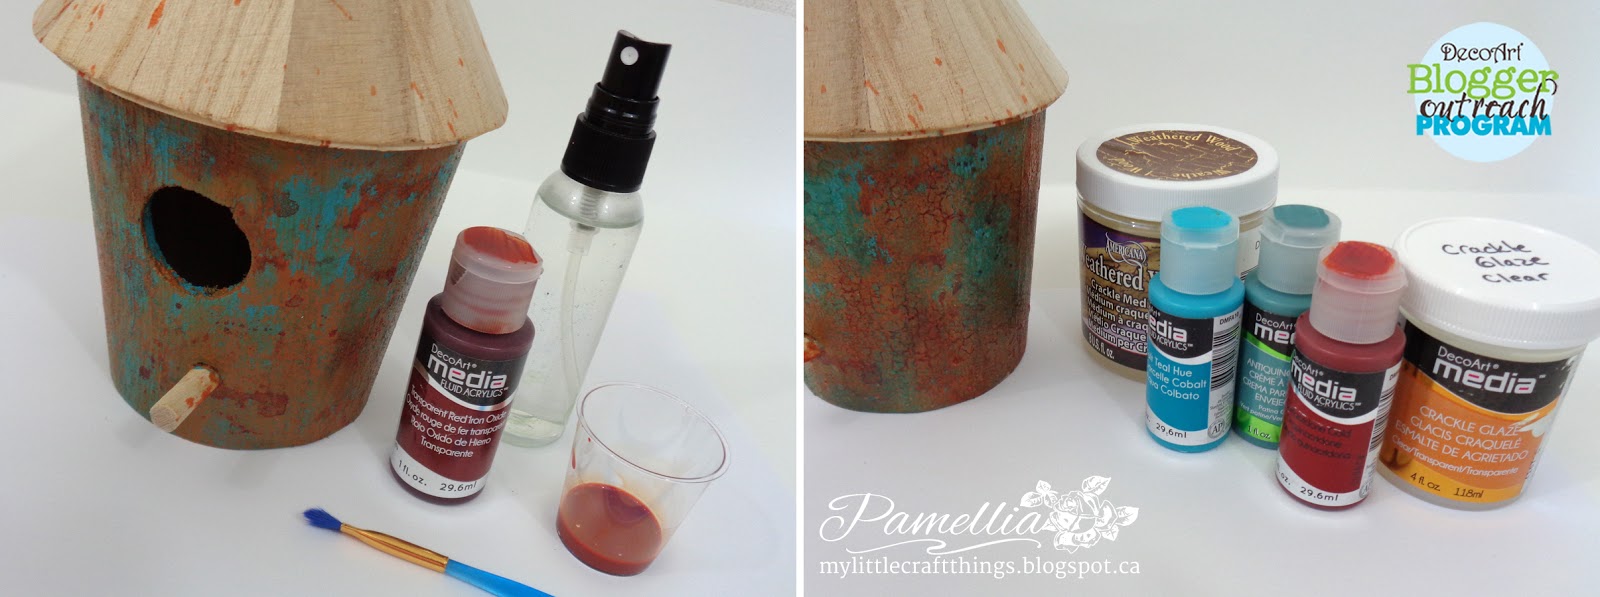
- I applied a coat of DecoArt Fluid Acrylics Cobalt Teal Blue. It's good and thick so I only needed one layer. Then I rubbed a little Vaseline here and there to act as a resist. I applied a coat of Fluid Acrylics Raw Sienna and let it dry. With a soft cloth wipe the paint off the areas where the Vaseline was.


- Next I took a little Fluid Acrylics Transparent Red Iron Oxide and mixed it with a little water. I flicked it in splashes and splotches using a paint brush. For the final step I used Andy Skinner's Mega Crackle technique with DecoArt Weathered Wood and Crackle Glaze to create some texture. I rubbed a little Quinacridone Gold into the cracks and touched up with Antiquing Cream Patina Green and Cobalt Teal Blue.


THE BUTTERFLIES:

- I dribbled a little DecoArt Americana Acrylics Peony Pink, Saffron Yellow and Desert Turquoise onto my craft mat and then smooshed a piece of paper into it I cut out the butterflies and covered them with a layer of DecoArt Crackle Glaze. Once dry, I rubbed some Fluid Acrylics Burnt Umber into the cracks. The great thing about using DecoArt paints for this technique is that when you apply your glaze or varnish, the colours don't bleed or blend together, your patterns stay crisp and vibrant!


THE BASE AND THE STAIRS:

- the stairs started as popsicle sticks. I coated them with some DecoArt Texture Sand Paste and the painted them with Fluid Acrylics Carbon Black paint. Once dry I rubbed on some Metallic Lustre Copper Kettle for a nice antiqued look.


- the base is an old wooden paper towel holder, which I covered with Modeling Paste and then painted with Crafter's Acrylics Hunter Green and Americana Acrylics Light Avocado and then lightly rubbed with some Metallic Lustre Gold Rush.


FAUX TREE BARK:

- I started with an empty Christmas gift wrap roll and covered it with bunched up masking tape. (the idea for this came from a wonderful tutorial by the very talented Claudia, also a DecoArt designer - thanks Claudia!) Then I painted the roll with Fluid Acrylics Burnt Umber and then applied random spots of Crackle Paste. Once it was dry I diluted some of the Burnt Umber and gave it another coat to colour the paste without filling in the cracks.


- I diluted some Americana Titanium Snow White and put it in a spray mister, a few squirts here and there. Once dry, I applied a coat of DecoArt Medium Ultra-Matte Varnish to seal the bark and leave a completely natural look.


I am entering my DecoArt birdhouse into the following wonderful challenges:


That's it for today. Thank you for stopping in and for all the amazing comments. I read and appreciate every single one! If you have any questions, please let me know.